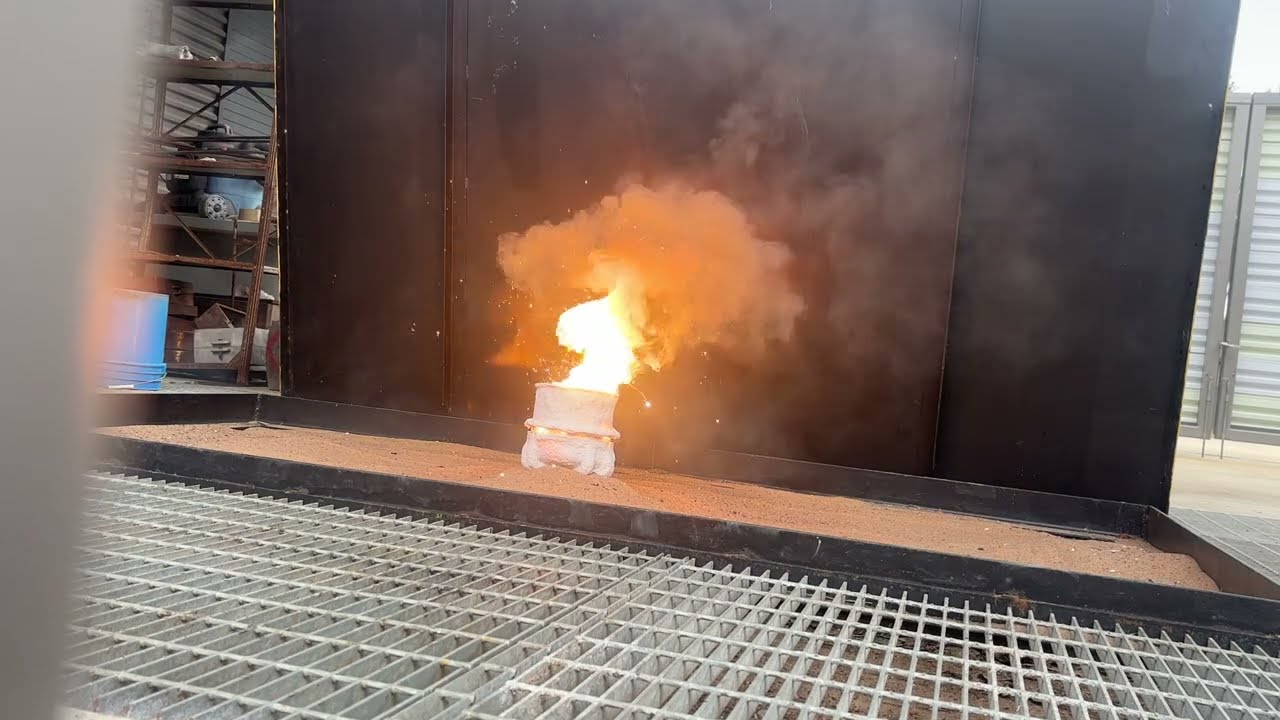
Combustion temperature — aluminothermic reduction
25°C
A conventional foundry furnace reaches casting temperature over the course of hours. The counter approximates the temperature rise that occurs during aluminothermic reduction — from room temperature to molten iron in under two seconds.
Mold-Integrated Exothermic Iron Casting

Iron from
thermite.

Aluminothermic reduction of iron oxide within ceramic shell investment molds produces cast iron directly from thermite combustion. The mold system is built around 3D-printed PLA positives that contain the combustion chamber, vents, sprues, and sculpture in one form.

Reaction Fe₂O₃ + 2Al → Al₂O₃ + 2Fe
Mold system Ceramic shell investment
Positive material FDM-printed PLA
About this project

One person, one kiln

Casting iron typically requires a foundry — industrial equipment, high-temperature furnaces, and multiple trained operators working together. ExothermiCast is an attempt to reduce those requirements to what one person can manage alone. The only specialized equipment required is a kiln. Everything else is mixed by hand. The goal is not to make iron casting cheap, but to make it possible without institutional infrastructure.

Fabrication sequence

From print to cast iron

The ceramic shell investment mold is consumed in the casting event and is configured for a single use.

PLA positive assembly showing combustion chamber, sprue, sculpture geometry, and vent risers
01 — POSITIVE
PLA print
The complete mold assembly — combustion chamber, sprue, sculpture cavity, and vents — is printed as a single PLA positive. The print establishes all internal void geometry prior to shell application.
Silicon from the ceramic shell material that contacted the melt pool investment applied over PLA positive assembly
02 — SHELL
Silicon from the ceramic shell material that contacted the melt pool investment
The PLA positive is dip-coated in ceramic slurry and stuccoed in sequential layers until sufficient shell thickness is achieved. The slurry remains workable in a stationary bucket between coats — no motorized agitation required.
Looking down into the open combustion chamber after PLA burnout, ceramic shell wall visible
03 — BURNOUT
PLA burnout
The shelled assembly is fired to 1000 degrees F, melting out the PLA positive and leaving the ceramic shell as the mold. The plug visible in the bottom of the combustion chamber pictured here is a shaped 1/4 inch piece of scrap cast iron.
Thermite charge materials — two 5lb jars of United Nuclear cast iron thermite, ignition mix, and sparklers
04 — CHARGE
Thermite loading
Commercially available thermite is loaded in granular form into the combustion chamber. Charge mass is calculated from the chamber volume and the measured density of the granular material. Ignition is initiated using a sparkler inserted into a bed of thermite ignition mix at the top of the charge.
Thermite ignition — aluminothermic reaction at approximately 2500 degrees Celsius
05 — CAST
Ignition and fill
Ignition initiates the aluminothermic reaction at approximately 2,500°C. Molten iron drains by gravity through the sprue into the sculpture cavity and exits at the vents. Al₂O₃ slag separates and floats above the iron.
Cast iron batwing form after mold break, held in hand
06 — FINISH
Mold break and finishing
The ceramic shell is broken away from the solidified casting. Sprues and vents are shown here still attached to the sculpture.
Test 002 — Ignition and cast
Test 002 aluminothermic ignition — click to watch on YouTube
Click to watch on YouTube — Test 002, Schwarz CLP, aluminothermic ignition and pour
Mass balance

Charge and yield

To determine the amount of thermite I need, I start by determining the weight of the sculpture in iron. I created a volume calculator for use with my STL files. You can test it out below by using the files I have supplied, or you may use your own files. I scale the piece up or down and bring the file into the volume calculator to determine the sculpture's final weight in iron. Once I determine the scale of the object I am going to cast, I design the sprue and venting system, which is attached to the sculpture, and import that file into the calculator. The calculator determines the mass of the total object — the addition of sprues and vents to the sculpture volume gives the total amount of iron necessary to fill the mold. This weight is then used to calculate the volume of thermite needed. The calculator can also determine the size of the combustion chamber cylinder. Several variables can be adjusted, including iron yield per pound of thermite and the height and diameter of the cylinder. At this point you should be able to add the combustion chamber to the sculpture, sprues, and vents in your 3D model and print.

Schwarz CLP combustion chamber cylinder on the printer
Schwarz CLP combustion chamber cylinder — fresh off the printer with supports still attached
Combustion chamber sizing tool

Volume calculator

Import an STL of your sculpture to calculate its volume, then use the cylinder solver to determine the required combustion chamber height for a given diameter. Yield factor and density parameters are editable.

Volume calculator

The calculator below is fully functional — drag any STL file into it to calculate volume and size a combustion chamber for your own work.

The three example files below use the Schwarz CLP casting as a demonstration. Click any button to load the file directly into the calculator.

Step 01
Sculpture only

Load this file first to calculate the volume and estimated weight of the finished cast iron piece. Scale the sculpture geometry up or down based on the target weight before proceeding.

Step 02
Sculpture + sprues + vents

Load this file to calculate the total volume of iron needed to fill the mold — sculpture, sprues, vents, and a small margin at the base of the combustion chamber. This figure determines the thermite charge mass and sets the combustion chamber dimensions.

Step 03
Complete assembly

The complete casting unit — combustion chamber, sprues, vents, and sculpture — as a single form. This is the file that gets 3D printed and invested in ceramic shell.

Shell system

Materials

Ceramic shell slurry

The ceramic shell slurry uses Remasol SP-30 colloidal silica as the sole binder throughout all coats. To prepare the binder, start with approximately one quarter gallon of Remasol in a bucket and begin sifting xanthan gum through a 200-mesh sieve onto the surface, whisking it in by hand incrementally. As the mixture thickens, add additional Remasol as needed until the xanthan gum is fully dispersed into a half gallon of binder — 25 grams of xanthan gum total. Slow hand mixing is essential — attempting to accelerate the process with a mechanical paddle results in a lumpy, gelled mixture. The mixture is then pressed through the sieve a second time using a rubber spatula to break up any remaining agglomerates. A second half gallon of Remasol is added, and the combined mixture is allowed to rest overnight so the xanthan gum fully hydrates. The following day, zircon flour and fused silica are incorporated at a 5-to-1 ratio until the slurry reaches the target viscosity, measured at 25 seconds using a standard Zahn cup test. This recipe yields one gallon of slurry, sufficient to coat one complete casting unit. I start with 5 pounds of silica flour and one pound of zircon flour to one gallon of the Remasol and xanthan gum mix, and begin mixing it in. The mix generally needs about 15 lbs of silica flour and 3 lbs of zircon flour added to the Remasol mixture to achieve proper viscosity. The silica in suspension may settle on the bottom after several days, but will not solidify, and the mix can be reconstituted by stirring.

The shell is built in 12 sequential dip coats, all drawn from the same slurry. Before each dip, the shell surface receives a light mist of Remasol SP-30 from a spray bottle. The stucco sequence is graduated: three coats with no stucco applied, three coats with fine silica sand, three coats with medium grade silica sand, and three coats with coarse silica sand. A minimum of one hour of drying time is observed between each coat.

Xanthan gum and Remasol SP-30 mixture before overnight hydration
Remasol SP-30 and xanthan gum mixture at the half-gallon stage — correct appearance before overnight hydration

Dip schedule

A printable 12-coat dip schedule for field use is available as a separate page.

→ Open dip schedule

Component Function Application
Remasol SP-30Colloidal silica binderAll coats
Xanthan gumSuspension agentSlurry additive
Zirconium from the zircon flour in the ceramic shell slurryRefractory fillerSlurry additive
Fused silica flourRefractory fillerSlurry additive
Fine silica sandStuccoCoats 4–6
Medium silica sandStuccoCoats 7–9
Coarse silica sandStuccoCoats 10–12
Remasol SP-30 (spray)Wetting agentBetween coats
Reference

Types of iron

Iron and steel are the same base metal. The difference between them is how much carbon is dissolved in the material, and in what form that carbon exists.

Wrought iron contains almost no carbon — less than 0.1%. It is soft, malleable, and can be worked by hand at the forge. It was the dominant iron material for most of human history before the industrial era and is rarely produced today.

Steel contains between 0.1 and 2.1% carbon. The carbon makes it harder and stronger than wrought iron while retaining enough toughness to be useful structurally.

Cast iron contains between 2.1 and 4.3% carbon. At these levels iron flows well in the liquid state, making it ideal for casting into molds. It is more brittle than steel but holds fine detail and is historically the material of choice for decorative iron casting. Standard foundry gray iron falls in this range.

Hypereutectic cast iron contains more than 4.3% carbon — more than the iron can hold in solution as it solidifies. The excess carbon separates out within the metal as the casting cools.

Materials characterization — SEM/EDX

Cast metal and slag analysis
Tests 001 and 002

Prepared SEM samples from Test 001 and Test 002 — metal and slag specimens, polished and mounted
Prepared samples — Test 001 (left) and Test 002 (right). Metal specimens polished for bulk matrix analysis. Slag specimens mounted for comparative EDX.

Samples from Test 001 and Test 002 were polished, prepared, and analyzed using a scanning electron microscope. Polishing the samples before analysis ensures the results reflect what is actually inside the metal rather than surface contamination.

Test 001 — June 2026
Plain Thermit / Iron yield 33.4%
SEM Test 001 metal polished surface
Metal — polished, x30, 500μm
SEM Test 001 slag
Slag — x30, 500μm
Metal — EDX composition
ElementMass%Atom%Note
Fe77.0947.16Iron is the dominant element, confirming the process successfully produced an iron-based casting
C10.7130.47Carbon is present at an unusually high level. Its origin is not confirmed
O8.6718.50Oxygen in a polished metal sample indicates small particles of metal oxide trapped inside the casting during solidification
Si2.533.08Silicon entered the melt from the ceramic shell material that surrounds the mold during casting
Cu0.660.35Copper entered the melt from the US quarters used to seal the combustion chamber. Quarters are approximately 91% copper
Al0.350.44Small amounts of aluminum oxide from the reaction byproduct were trapped in the metal rather than separating cleanly into the slag layer
Slag — EDX composition
ElementMass%Atom%Note
O45.3952.15Oxygen combined with aluminum forms aluminum oxide — the primary byproduct of the aluminothermic reaction and the dominant material in the slag
Al29.8920.36Aluminum oxide is what remains after aluminum strips oxygen from the iron oxide during the reaction. It floats above the iron and is removed after casting
C14.3822.01Source undetermined
Si2.871.88Silicon from the ceramic shell material that contacted the melt pool
Na2.171.73Sodium from the Remasol SP-30 colloidal silica binder, which is stabilized with sodium hydroxide
Fe4.391.45Iron that did not separate cleanly from the slag and was lost with it rather than recovered as casting. This accounts for part of the difference between theoretical and measured yield
Ca0.910.42Source undetermined

The metal produced in Test 001 is predominantly iron at 77% by weight, which is expected. Carbon is present at 10.71% — an unusually high level whose origin has not been confirmed. Standard cast iron runs between 2.5 and 4% carbon. At 10.71% the material falls into the hypereutectic range, meaning it contains more carbon than iron can hold in solution at solidification. The samples are being retested to clarify the carbon source before further conclusions are drawn.

Copper at 0.66% entered the melt from the quarter plugs used to seal the combustion chamber during ignition.

The slag — the non-metal material that separates and floats above the iron during the reaction — is composed primarily of aluminum oxide, which is the expected byproduct of the aluminothermic reaction. Iron at 4.39% in the slag confirms that some metal was carried out with the slag rather than recovered as casting, accounting for part of the gap between theoretical and measured yield. Elements from the ceramic shell — silicon, sodium, calcium — are also present in the slag, indicating shell material infiltrated the melt pool during casting.

Test 002 — June 2026
Plain Thermit + Cr2O3 / NiCO3 / Al / yield ~21%
SEM Test 002 metal polished surface
Metal — polished, x33, 500μm
SEM Test 002 slag
Slag — x33, 500μm
Metal — EDX composition
ElementMass%Atom%Note
Fe56.5730.47Iron remains the dominant element but at a lower percentage than Test 001, reflecting the presence of additional alloying elements in the matrix
O25.6348.18The high oxygen level indicates that chromium oxide and other added oxides were not fully reduced by the aluminum in the charge. Unreduced oxide particles were trapped in the solidifying metal
Al5.115.69Aluminum oxide particles that did not separate into the slag were captured in the metal during solidification, contributing to the high oxygen reading
Cr4.942.86Chromium from the chromium oxide addition successfully entered the cast metal — confirming that intentional alloying through the aluminothermic process is achievable
C3.939.84Carbon present at a lower level than Test 001. Origin not confirmed
Si1.031.11Silicon from the ceramic shell material that contacted the melt pool
Ni0.960.49Nickel from the nickel carbonate addition successfully entered the cast metal, though at a concentration far below what would be needed for a stainless steel alloy
Zr0.840.28Zirconium from the zircon flour in the ceramic shell slurry, not detected in Test 001, suggesting deeper shell penetration in Test 002
Na0.610.80Sodium from the Remasol SP-30 colloidal silica binder, which is stabilized with sodium hydroxide
Ca0.380.29Source undetermined
Slag — EDX composition
ElementMass%Atom%Note
O55.5662.34More oxygen in the slag than Test 001, reflecting the additional oxide compounds introduced in the charge
Al23.8115.84Aluminum oxide is what remains after aluminum strips oxygen from the iron oxide during the reaction. It floats above the iron and is removed after casting
C11.9217.81Source undetermined
Si3.061.96Silicon from the ceramic shell material that contacted the melt pool
Cr2.170.75Chromium split between the metal and the slag. More chromium entered the metal than remained in the slag
Fe1.970.63Less iron was lost to the slag in Test 002 than in Test 001, suggesting improved metal-slag separation
Ca0.610.27Source undetermined
Mg0.410.30Magnesium at trace levels. Source undetermined
Zr0.490.10Zirconium from the zircon flour in the ceramic shell slurry
EDX spectrum Test 002
EDX spectrum — Test 002 metal. Characteristic peaks: CrO, Fe, Al, Si, Ni, Zr.

Test 002 asked whether intentional alloying additions could survive the aluminothermic reaction and enter the cast metal. Chromium oxide and nickel carbonate were added to the charge — the high-temperature aluminum reaction strips the oxygen away from those compounds and releases the chromium and nickel as free metals into the melt pool.

The results confirm that this works. Chromium at 4.94% and nickel at 0.96% are both present in the metal. The system can introduce alloying elements through the aluminothermic process.

The casting is magnetic, however. A true 304 stainless steel requires approximately 18% chromium and 8% nickel to achieve a non-magnetic crystal structure. The concentrations achieved in Test 002 are a fraction of those targets

The high oxygen reading in the metal at 25.63% indicates that not all of the chromium oxide and other oxides were fully reduced — particles of unreduced oxide were trapped in the solidifying metal rather than separating into the slag. This points directly to insufficient aluminum in the charge.

The slag from Test 002 contains 2.17% chromium, confirming that chromium split between the metal and slag phases — more chromium entered the metal than remained behind,

Zirconium appeared in both the metal and slag from Test 002 but not Test 001, likely from the zircon flour in the ceramic shell slurry penetrating the melt pool.

Materials characterization

SEM/EDX Analysis

Scanning electron microscopy and energy dispersive X-ray analysis of cast iron specimens from Test 001 was conducted using the SEM facility at the University of Central Arkansas, Department of Physics. Initial analysis was performed on unpolished, uncoated surface samples to establish instrument parameters and assess general composition.

Results from unpolished samples are not considered representative of bulk matrix composition. Prepared cross-sections, polished and carbon coated, analyzed at multiple points across the matrix, are required before compositional conclusions can be drawn. Prepared sample analysis is planned for a subsequent session.


Acknowledgment

SEM/EDX analysis of Test 001 specimens was conducted with the assistance of Dr. Rahul Mehta, retired Professor of Physics, Department of Physics, Astronomy, and Engineering, College of Science and Engineering, University of Central Arkansas. Dr. Mehta generously provided his time and expertise in instrument operation, sample handling, and data interpretation during the initial analysis session.

Preliminary EDX results — Test 001

Single point analysis. Unpolished surface sample. ZAF correction. Pure element standards. Fitting: 0.3358.

Element
Mass%
Atom%
Fe
84.18
64.33
C
8.20
29.15
Cu
4.63
3.11
Zn
1.35
0.88
Si
0.98
1.50
Al
0.65
1.02

Cu and Zn introduced via sacrificial plug material. C quantification unreliable on unpolished surface. Prepared sample analysis pending.

Dr. Rahul Mehta, Professor Emeritus of Physics, UCA — SEM instrument, Department of Physics
EDX quantitative results — Test 001 unpolished surface sample, ZAF correction

In the photograph you can see the scanning electron microscope, a JEOL InTouchScope. Rather than using visible light, it fires a focused beam of electrons at the sample surface, producing images at magnifications far beyond what an optical microscope can achieve. When the electrons strike the surface, atoms emit X-rays at energies unique to each element — the detector reads those X-rays and identifies what the material is made of and in what proportions. This is the data shown in the table above.

Sculpture

Cast forms

My current work targets an abstract geometric form derived from a triply periodic minimal surface called the Schwarz CLP.

The Schwarz CLP is a minimal surface first described by the German mathematician Hermann Amandus Schwarz in 1865. A minimal surface is one in which the mean curvature at every point is zero — the surface takes the most efficient path between its boundaries, analogous to the form a soap film assumes when stretched across a wire frame. Triply periodic means the surface repeats in three independent directions, tiling space continuously like a crystal lattice. The CLP designation — Crossed Layers of Parallels — refers to the specific symmetry of this variant within Schwarz's family of surfaces, a name given by American mathematician Alan Schoen in 1970.

These forms have no undercuts, which simplifies sprue and vent placement. Any geometry that can be printed without support material can be cast with the sprues and vents positioned at the base, leaving the surface of the sculpture untouched. A primary goal of this work is to produce finished cast pieces that require no surface treatment beyond cleaning. Grinding and finishing only occur on the base, which is hidden when the piece is displayed.

I've used this piece as the basis for sculpture in the past. The photos below illustrate the nature of this work. The first photo shows the piece I'm currently working with, chosen for its simplicity in casting. The second photo shows a piece I created several years ago which illustrates how the Schwarz CLP surface divides space into two continuous, interlocking regions, and how it appears when arranged as a cube. The Schwarz CLP itself is cast in bronze, while the two negative spaces surrounding it within the cube boundary are each cast separately in aluminum. The different metals distinguish the positive form from the two volumes it separates. Because the surface is triply periodic, all three pieces interlock — neither the bronze nor either aluminum piece can be removed without passing through the others.

The third photo shows the three pieces pulled apart — the bronze Schwarz CLP form and the two aluminum negative space volumes were photographed during finishing, showing how they interlock with each other. The exterior faces of the cube were polished while the interior surfaces — where the three pieces meet — were left in their cast state. The last photo shows the three distinct forms, 3D printed and separate from each other.

Schwarz CLP — PLA print
Schwarz CLP Cube with Negative Space
Schwarz CLP Cube Separated — during finishing
Schwarz CLP Separate — three interlocking pieces
Mid-South Sculpture Alliance ConFab — October 2–3, 2026

My demonstration will take place Friday, October 2nd at 10am at the Windgate Center for Fine and Performing Arts, University of Central Arkansas, Conway, Arkansas. View the full workshop and demo schedule →

Images from the ConFab demonstration will be added here after October 2026.

— image —Shell construction
— image —Thermite charge
— image —Ignition
— image —Cast result
Direct contact

Get in touch

Questions about the process, materials, or upcoming demonstrations can be sent directly using this form. Messages go to Andy Huss and are not publicly visible.

Acknowledgments

The author wishes to thank Dr. Bryan Massey, Chair of the Department of Art & Design at the University of Central Arkansas, for his support of this research through materials funding, access to departmental facilities, and institutional encouragement throughout the development of this project. The author also wishes to thank Dr. Rahul Mehta, retired Professor of Physics, Department of Physics, Astronomy, and Engineering, College of Science and Engineering, University of Central Arkansas, for generously providing his time and expertise in SEM/EDX instrument operation, sample handling, and data interpretation during the initial materials characterization session. I would also like to thank the Mid-South Sculpture Alliance for including me in this year's ConFab.